|
|
|
The first thing your icon needs is a transparent background. After all, without a transparent background your icon isn’t going to make the cut. And we don’t want that.
|
|
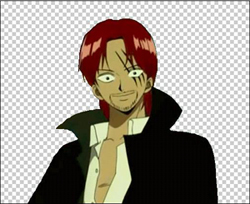
Now before you can give your image a transparent background, you need well… an image. For this Tutorial we will be using Red-Haired Shanks from One Piece. |
I use two different methods for getting a transparent background. Naturally in this Tutorial we will be covering both. Which you chose is up to the image you are using and your personal preferences.
Method One:
It is all about "Magic"This method is can be a quick and easy way to erase the background and make it transparent.
|
|
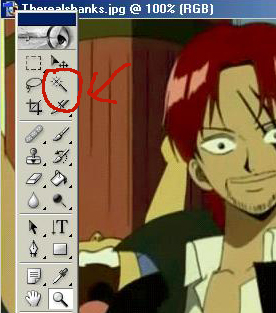
First step is to select the Magic Wand Tool from your Image Tools Toolbar. |
|
|
Now using the Magic Wand Tool, pick an area that you want deleted and click it. The area should now be selected. |
|
|
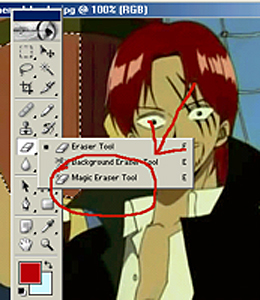
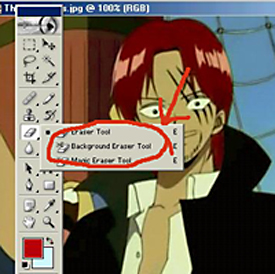
Now right click the Eraser Tool in the Image Tools. This should let you select between Eraser Tool, Background Eraser Tool, and Magic Eraser Tool. Select The Magic Eraser Tool. |
|
|
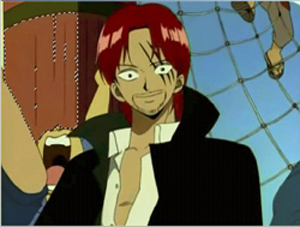
Now Use the Magic Eraser Tool and click the area selected by the Magic Wand Tool. The whole area should now be erased. |
|
|
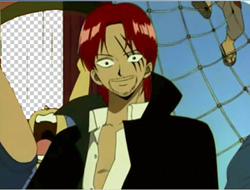
Now Just repeat The process of using the Magic Wand and Magic Eraser Tools until you have all the unwanted areas removed. (there will be a completed pic available later in the Tutorial) |
Well, if you tried that method on some of your pics you might have noticed that getting the magic wand to select the areas you want to delete and not the areas you don’t want deleted selected can be a Challenge. Unfortunately, this method works best if the background of your image is VERY different from the image you are trying to iconify. The next method is a little more difficult, but can be more accurate to getting the image you want.
Method Two:
The "Outline" MethodTo be honest I don’t really know how common a method this is. For all I know it is a pvansitt original method (yeah right, I wish). This is the Method I use 98% of the time. It takes a bit of time, but it usually does a good and accurate job of eliminating backgrounds around your image for iconification.
|
|
First thing you want to do is find the background Eraser Tool in you Image Tools Toolbar. This is easily done by Right clicking your Erasers Tool on the Image Tools Toolbar. |
|
|
Next find a spot on your picture and click it with the backround eraser. This Reveals a transparent background the diameter of your Backround Eraser. The reason for this will be cleared up in a moment. Note: Do to the fact that it will make a perfect circle the diameter of the eraser, it is best to pick a spot away from the image you want to keep |
|
|
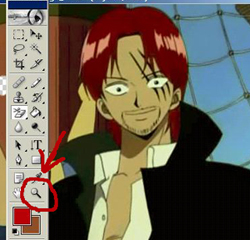
Now Locate the Zoom Tool on the Image tool Tool bar. |
|
|
Using the Zoom tool, Zoom into a section of the picture near the part you want to make an icon, so you can clearly see all the pixels, but still make out the division between the parts you want to keep and the ones you want deleted. |
|
|
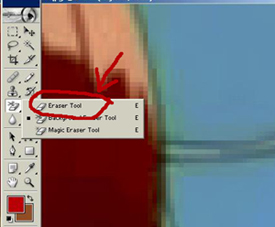
Now Go back to your Eraser Tools in the Image Tools Toolbar. Currently you should still have the Backround Eraser Selected. Right Click and this Time Select the normal Eraser tool. |
|
|
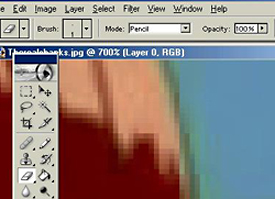
Make sure your Eraser is settings match the picture on the left. If you need to change the Brush diameter or Mode, do so now before you continue. |
|
|
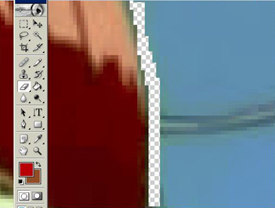
Now Using the eraser begin erasing around your image erasing the unwanted parts about two to three pixels away from the desired image. If you did the background eraser step, Then you should see the checkered white and grey background that indicates transparency. If you skipped it, then the eraser marks will look like whatever the background color is set at. |
|
|
After going all around your pic. You image should look something like the picture on the Right. You should have an Outline around your desired image that separates it from the background. |
|
|
Now your outline will serve as a barrier between the wanted and unwanted parts of your image. You are now free to Set the Brush diameter to whatever length you want and erase the unwanted parts, Till your Picture looks like this. (if you did the first method this picture should also be your end result) |
Congratulations, You now have a Transparent Background. But your image is far from icon worthy. Time to go on to the Next step.